
Most oral arguments are won before I ever step to the podium. The brief is already filed, the judges have read it, and my job is simple: know the record, know the standard of review, answer questions directly, and ask for the right relief.
If I were getting ready for oral argument today, I’d keep my prep focused on:
- 2 to 3 main issues, not every issue in the case
- Exact record cites for each point
- The right standard of review for each issue, such as de novo or abuse of discretion
- Short answers to hard questions about preservation, bad facts, and relief
- Court rules and timing, including rebuttal, check-in, and tech if the hearing is remote
- A short outline, not a full script
- Practice out loud, with interruptions
A few facts stand out. Oral argument is often brief and driven by questions, not speeches. And some judges report that argument changes their view of the outcome in about 10% to 20% of argued cases. So even in a short hearing, my prep can matter.
Here’s the core idea: I should trim the case down, tie every point to the record and the law, stay ready for questions, and keep my delivery calm and direct.
That’s the whole playbook in plain English.
The first time I argued anything in front of a judge, I was a broke grad student in Raleigh fighting a seatbelt ticket. I subpoenaed the officer who wrote it and asked him on the stand what, exactly, I had done that endangered anyone. I didn’t win because I was eloquent. I won because I had decided in advance what I was asking for and why.
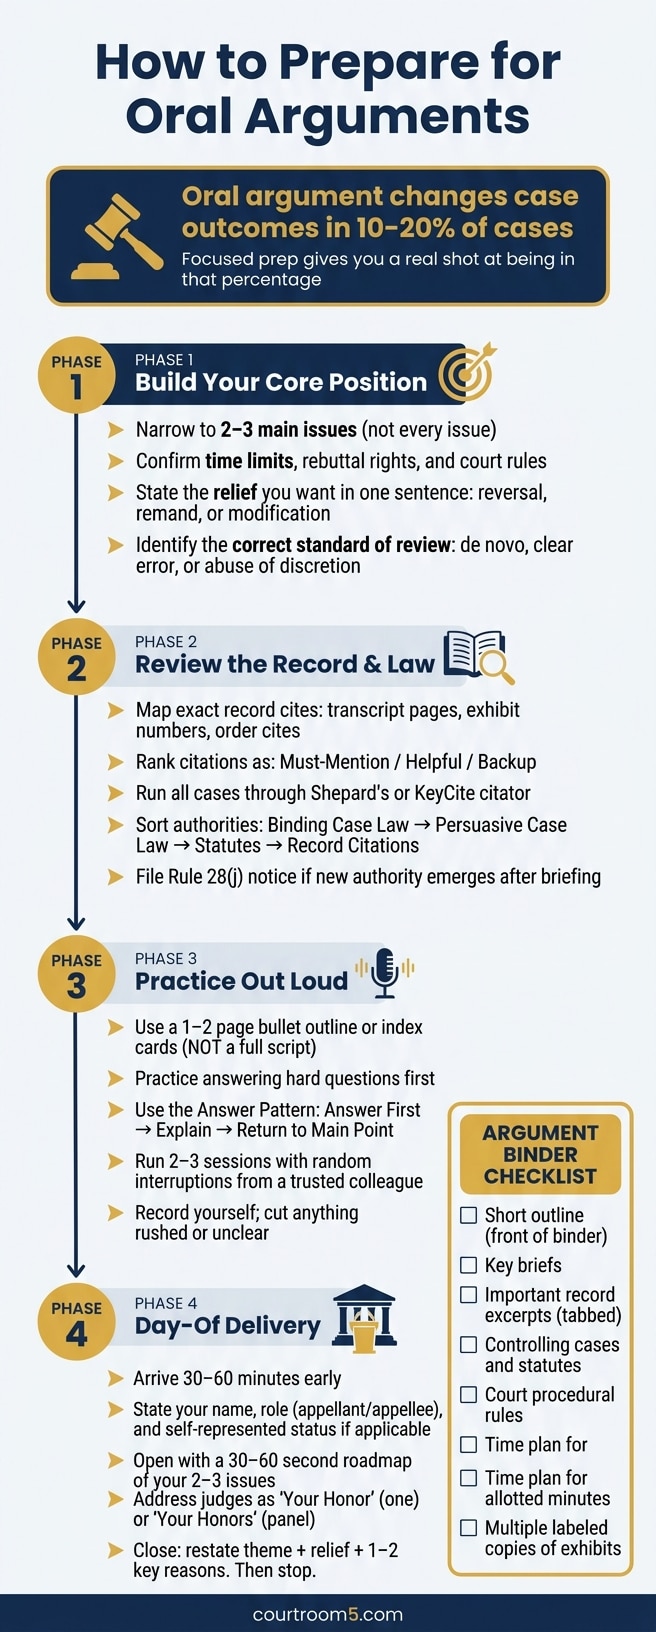
How to Prepare for Oral Arguments: A Step-by-Step Checklist
Art of Appellate Advocacy: Tips for Oral Arguments
Understand Your Appeal and Build Your Core Position
Before you start practicing, get clear on the relief you’re asking for and whether the court will hear oral argument. Check the docket, the argument notice, and the local rules. Some courts schedule argument on their own after briefing. Others require you to ask for it. If the case will be argued, pin down the rules that control your time and format.
Confirm Time Limits, Rebuttal Rights, and Court Rules
Once argument is set, verify the hearing date, start time, courtroom or video platform, the total time allowed per side, and whether any of that time is reserved for rebuttal. Record the hearing exactly as listed, such as Aug. 17, 2026, at 9:30 a.m. If the hearing is remote, check the login steps, tech-test instructions, and any video-attire rules.
Don’t assume you can hold back time for rebuttal. That right changes from court to court, and sometimes from case to case. Confirm how the court wants argument time divided before you build your outline.
With those rules in place, trim the argument to the points most likely to affect the outcome.
Narrow the Case to Two or Three Winning Points
Once the schedule and limits are clear, decide which issues deserve your time. Go back through your briefs and the record. Then rank each issue by:
- strength
- preservation
- effect on the outcome
In most appeals, two or three tightly framed issues work better than a long string of weaker ones.
For each issue you keep, say the relief you want in one sentence – reversal, remand, modification of the judgment, or other proper relief – and connect that relief to the error you want the court to fix. Frame each issue under the right standard of review. Use the right standard for each one: de novo, clear error, or abuse of discretion.
Reduce the appeal to a short issue list tied to the governing standard of review.
I learned this one the hard way. In our second eviction case, I walked in with every argument I’d ever thought of and no ranking among them. Their attorney — a former magistrate judge in that county — had one theory and stayed on it. Somewhere in the middle of my third point, the judge looked at me and said, “you talk too much.” We walked out with an eviction order and a $3,000 judgment. Two strong issues argued cleanly would have served me far better than eight.
Review the Record, Briefs, and Authorities
Once your issue list is set, the job shifts from spotting points to proving them. Every claim you plan to make should tie back to the right record page, the right case, and the right statutory text. Judges pick up fast on whether counsel can point to the exact support behind an answer.
Reread the Briefs and Mark Key Record Citations
For each main issue, go back through the opening, response, and reply briefs and map out the record support. This second pass is where you mark every record cite tied to that issue: transcript pages, exhibit numbers, and order cites. For each one, note whether the fact is disputed or undisputed and how much weight it carries for your side.
A short citation list helps a lot here. Keep one or two exact cites for each main point so, if the court asks, “Where in the record is that?”, you can answer without scrambling. A separate list or spreadsheet works well, with columns for:
- issue
- record cite
- description
- whether the fact is disputed
Then rank each citation as must-mention, helpful, or backup. Tab the order or judgment, docket sheet, key transcript pages, and key exhibits. Use the docket sheet to confirm filing dates and preservation. Stick with the court’s pagination, and label each tab clearly so you can get to it fast when the pressure is on.
Once those key record cites are in order, check every authority before argument.
A word of caution, because I’ve made this exact mistake. In our RICO case I filed a summary judgment motion on day 21 — technically allowed, strategically foolish. There was nothing in the record yet to cite, so the motion had nothing to stand on. I’m embarrassed by it to this day. If you can’t point to a page in the record, don’t make the argument.
Update Cases and Sort Binding From Persuasive Authority
Every case, statute, and rule cited in the briefs should be checked before you walk into court. Run your main authorities – and your opponent’s – through a citator such as Shepard’s or KeyCite. Start with negative treatment. A case may be overruled on one point but still good law on another. Write down the date you checked, ideally within a few days of the argument.
After that, sort your authorities in a way that makes them easy to use.
| Authority Type | How to Use It in Oral Argument |
|---|---|
| Binding Case Law | Cite as mandatory precedent the court must follow |
| Persuasive Case Law | Use to fill gaps or show your rule is widely accepted |
| Statutes and Rules | Use as the primary legal foundation; read the exact text |
| Record Citations | Prove a specific fact was established at the trial level |
If a key case has been overruled or limited, revise your argument and file supplemental authority under your court’s rules. If a relevant case comes out after briefing, file the required notice promptly and serve the other side.
After the law is current, turn to the panel and how it handles these issues.
Research the Judges and Check for New Developments
Before argument, read recent opinions from your court on the same issues. Watch for patterns in how the judges approach the case: how they frame the standard of review, whether they lean on statutory text or policy, and how they deal with pro se litigants. Use that work to sharpen your explanation, not to guess the outcome.
You should also run a targeted search for new decisions on your key issues. If a relevant case comes down after briefing, most appellate courts require a short notice – often called a Rule 28(j) letter in federal court – that gives the citation and explains why it matters, with a copy to the other side. Filing that notice promptly means you can discuss the new authority at argument with confidence, instead of getting caught off guard.
Practice a Clear and Flexible Oral Argument
Once your record cites are checked and your cases are up to date, the next job is simple in theory and hard in practice: turn all that prep into something you can say out loud with clarity and calm. The goal isn’t to sound dramatic or stiff. It’s to sound steady, respectful, and conversational, even when a judge jumps in.
Use a Short Outline Instead of a Full Script
Don’t write a full script. Duke Law‘s oral-advocacy guidance says this plainly: identify the two or three issues to discuss and “DO NOT WRITE OUT AN ENTIRE SPEECH.” A script can make you sound locked in. It also makes interruptions much harder to handle.
A better approach is a one- to two-page outline or a small set of index cards. Include your opening theme, two or three main points, the key record cites for each point, your best controlling authority, and a short closing request for relief. Set it up so you can find your place fast after an interruption.
| Preparation Method | Advantages | Drawbacks |
|---|---|---|
| Full script | Lowers the chance of forgetting an opening line | Hard to adjust when interrupted; can sound read or stiff |
| Bullet outline | Flexible, easy to scan, works well during live questions | Takes strong command of the case |
| Index cards | Easy to carry and sort by issue | Little room; can flatten hard points |
For most self-represented litigants, a bullet outline is the best middle ground. It keeps your argument organized without tying you to exact phrasing. That helps your answers sound natural instead of memorized.
Prepare for Questions, Weak Points, and Hypotheticals
Once you know your outline, put it under pressure. Start with the hardest questions, not the easy ones, and practice answering them head-on.
Focus on the places where your case is most exposed: bad facts, whether the issue was preserved below, the standard of review, jurisdiction, the authority that best backs your position, how your case differs from cases the judge may mention, and what relief you want the court to order. Those are the pressure points. They’re also where solid prep shows.
When a hard question comes, use a simple pattern: answer first, then explain, then return. Give a direct answer in a sentence or two. Then give a short explanation for why the concern doesn’t change the result. After that, come back to your main point. If you dodge the question, your credibility can slip fast. Short, direct answers do the opposite. They build trust and help you get back on track after the interruption.
Run Practice Sessions and Organize Your Argument Binder
Practice out loud. That’s how you catch rushed phrasing, weak transitions, and explanations that made sense in your head but not in your voice. Record yourself at least once, listen back, and cut anything that sounds hurried or muddy.
It also helps to have someone interrupt you on purpose. Ask a trusted friend, mentor, or colleague to jump in with hard questions about the facts, preservation, procedure, or the relief you’re asking for. That kind of drill forces you to respond without losing your composure. Two or three practice sessions with random interruptions can go a long way toward building confidence.
Your argument binder should be plain and easy to use at counsel table. Put your outline in the front. Then include the key briefs, the most important record excerpts, your controlling cases and statutes, the court’s procedural rules, and a short time plan that shows how you’ll use your allotted minutes. A Federal Defender checklist suggests printing the outline and bringing more than one copy of key materials. The binder is there to help you find pages fast, not to give you something to read from.
Once the outline starts to feel automatic, stop rehearsing lines and start practicing delivery.
Deliver Your Argument and Close Strong
Follow Courtroom Procedure and Speak With Confidence
This is the moment when prep turns into performance. Keep it short, answer the question in front of you, and stay grounded in the record. A simple flow works best: record first, clear answer second, relief last.
When your case is called, stand up, walk to the podium, and wait until the court invites you to begin. State your name, say whether you are the appellant or appellee, and mention that you are self-represented if that applies. Then give a short roadmap – about 30 to 60 seconds. Lay out your two or three issues and tell the court what relief you want.
Speak at a steady pace. Use plain English. Look at the judges instead of reading from your notes line by line. If you saved time for rebuttal, use it only to respond to points made by the other side. Don’t use rebuttal to bring up new issues.
If a judge cuts in, stop right away and listen. Address one judge as Your Honor and the full panel as Your Honors. Give direct answers. Stay composed, even when the question is tough. Judges tend to respect lawyers and self-represented parties who are candid and responsive. Keep your tone civil, and focus on the argument – not opposing counsel.
Use a Final Checklist Before You Walk In
Arrive 30 to 60 minutes early.
| Task | When to Complete | What to Bring or Confirm |
|---|---|---|
| Confirm courtroom location | Day before | Exact courtroom number, floor, and building entrance |
| Check-in process | Day before | Arrival time, clerk check-in requirements, case number |
| Security screening | Day before | Government-issued ID; check the prohibited items list |
| Technology rules | Day before | Confirm whether laptops or tablets are permitted |
| Travel timing | Day before | Map your route; confirm parking or transit options |
| Argument binder | Day before | Final outline and required materials |
| Professional attire | Day before | Conservative business clothing, set aside and ready |
| Evidence/exhibits | Morning of | Multiple labeled copies; confirm the court’s submission rules |
Once the logistics are set, your job is simple: present your case calmly and clearly.
One thing I’d add to that logistics list: if your court doesn’t provide a court reporter, bring your own. In our Florida foreclosure case, a hearing went our way precisely because someone was transcribing it — the judge backed all the way off some biased language in her own order once she knew it was on the record. Years earlier, when I argued a motion to dismiss in small claims, the court clerk sat there with his mouth open the whole time, like I was some kind of unicorn. You don’t have to be a lawyer to argue well. You have to be prepared, and you have to make sure someone is writing it down.
Conclusion
Oral argument rewards focused prep. When you know what the court wants – clarity on the main legal issues, honest answers to hard questions, and a clear statement of the relief you seek – the process feels a lot less overwhelming.
At the end, keep your close short. Restate your main theme, the relief you want, and one or two key reasons the law and record support that result. Don’t add new issues or new authorities at that point. Thank the panel, then stop.
Courtroom5 helps pro se litigants organize their cases and prepare for appellate advocacy. Federal appellate judges report that oral argument changes their view of case outcomes in roughly 10–20% of argued cases. That’s a meaningful opening, and careful prep gives you a fair shot at using it well.
FAQs
How do I choose my strongest issues for oral argument?
Focus on the points that do the most work for your case and that you can back up with the strongest statutes, rules, or appellate case law. You do not need to argue every possible issue. In fact, trying to do too much can weaken your position. A few key arguments that tie the law directly to your facts will usually land better than a long list of weak ones.
It also helps to build a simple roadmap. Match each piece of evidence to the legal claim it supports, so the reader can see the connection right away. That way, your argument doesn’t feel scattered. It feels grounded, direct, and hard to brush aside.
What should I do if a judge asks about a weak fact or preservation problem?
Address the concern head-on and be candid. Don’t get defensive; the judge may just be testing or sharpening their view of your position.
Be honest about any limit, then steer back to your strongest legal points. If you don’t know, say so instead of guessing or dodging. Candor builds credibility.
How should I prepare for a remote oral argument?
Focus on how you deliver the material, not just what’s in it.
Use clear, simple language. Then practice out loud. That matters more than people think. A point that sounds fine in your head can come out awkwardly when you say it.
It also helps to rehearse short answers to judge questions you’re likely to get. Keep those answers tight and easy to follow, especially if your time limit is only 10–15 minutes.
Before the session, test your audio and video. Don’t leave that to chance. Record a practice run too. It’s one of the best ways to catch problems with sound, pacing, eye contact, or slides.
If you lose your place during the presentation, pause. Take a breath and politely ask for a moment to check your notes. That usually comes across better than rushing and getting more flustered.
And if you don’t know an answer, say so. Don’t guess.